Customizing my Ren'Py GUI: Text!
Hello! I'm back, back, back, back again to talk about the design of my game! This time around, I've been looking at the text in the GUI and changing up stuff with that. Things I'll be covering are as follows:
1. Adding outer glow to text
2. Adding outer glow to buttons (and other images)
3. Changing font & text scale (based on user input)
Here's an example of what my Preferences screen looks like after adding the glow and text options: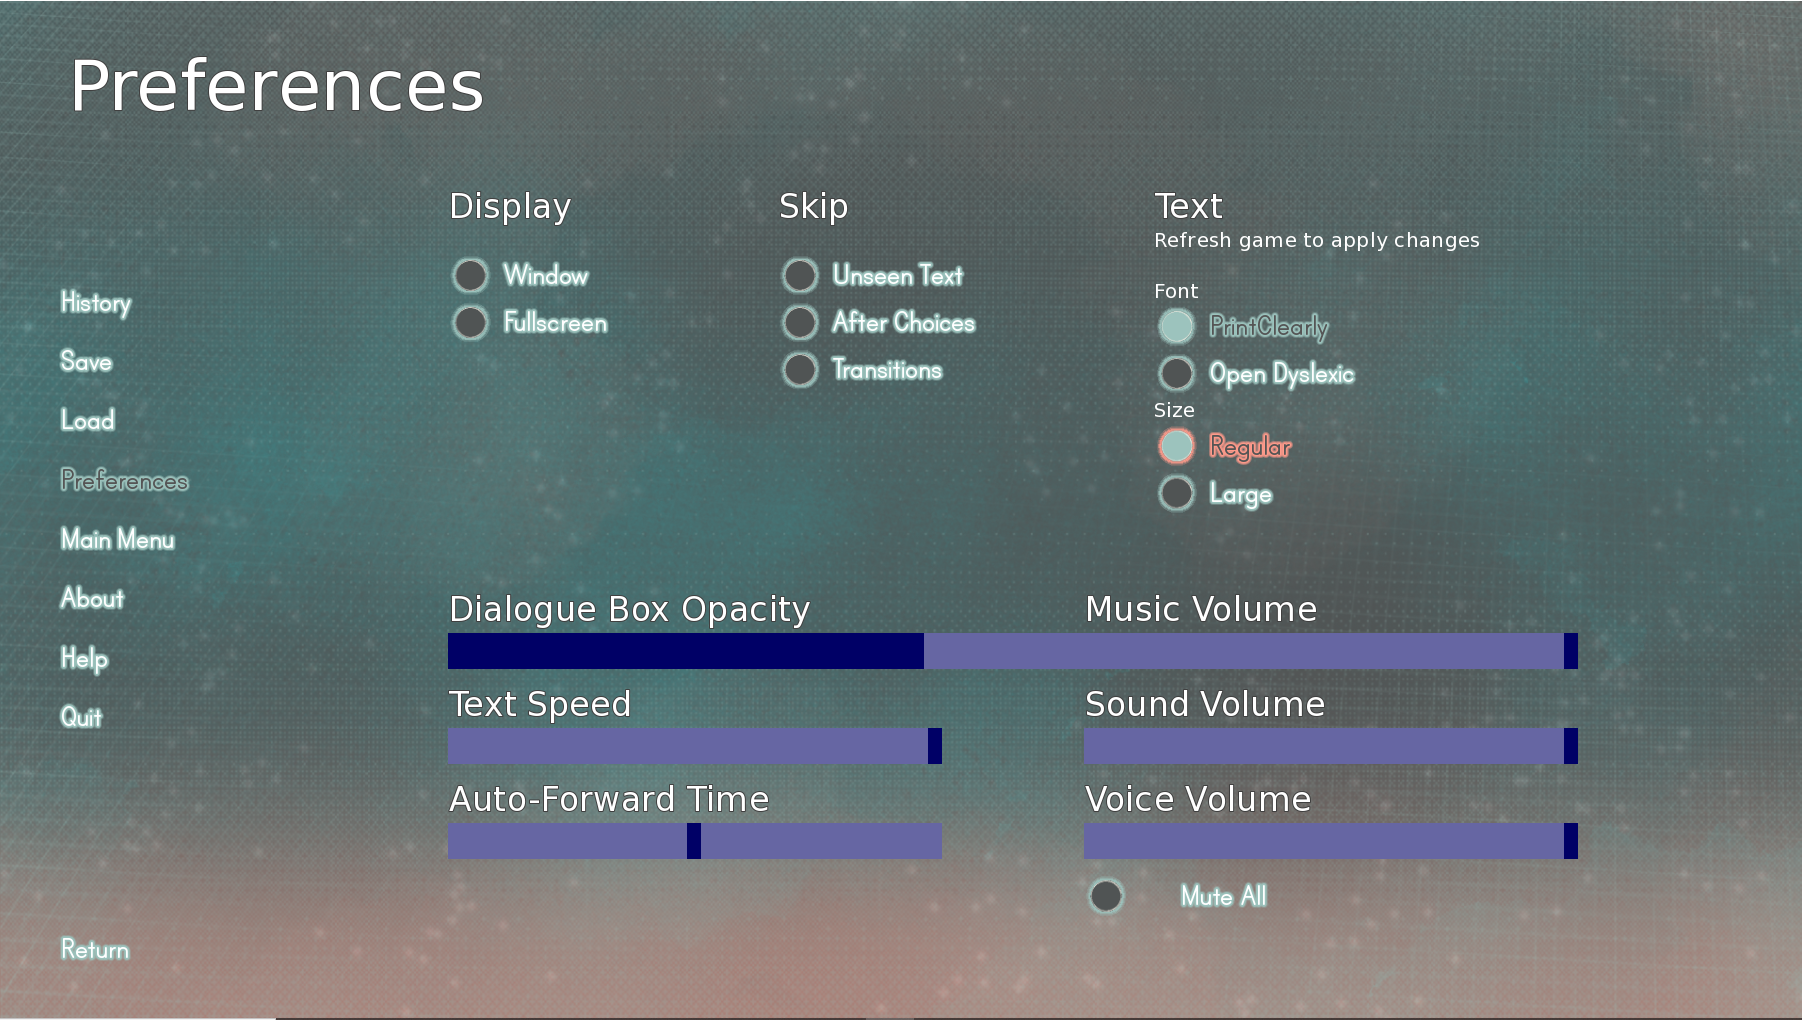

Don't mind the sliders, okay!??!?! I haven't touched them yet, OKAY!?!?
Adding Outer Glow to Text
So here I was, thinking adding a glowey outline to my text would be difficult, but really, it's not at all! An Ren'Py makes it easy to understand, so let me break it down for you!
So if we're only adjusting the colour (which outer glow is tied to), then we only need to go in the colour section and add the following lines for whatever text we want modified For the interface text, you'll use 'gui.interface_' lines, and for things like choice buttons, you'll use 'gui.choice_button_', make sense? Example:
define gui.interface_text_outlines = [ (absolute(3), "#9cc3bd57", absolute(0), absolute(0)), (absolute(2), "#9cc3bdcc", absolute(0), absolute(0)), (absolute(1), "#9cc3bd", absolute(0), absolute(0))]
define gui.interface_text_hover_outlines = [ (absolute(3), "#ff9a8b73", absolute(0), absolute(0)), (absolute(2), "#ff9a8bb0", absolute(0), absolute(0)), (absolute(1), "#ff9b8b", absolute(0), absolute(0))]
The glow effect works by essentially adding 3 different outlines, with '1' being the closest to the text, and '3' being furthest away. To really sell the look, I chose the main colour that I wanted my glow to be and added it's hexcode to the '1' group. Then, I added it to the '2' group, but then turned down the alpha so that the glow becomes less intense. Then I did the same for the '3' group, but turning down the alpha even more. If you did it correctly, you should have an awesome lil' glow effect that really makes your text pop off the page!
Just add these in for all the different text that you want to adjust, and you're golden! Or red, or blue, or purple!
One thing that really did me in for a good long time, was the fact that 'interface_text' applies to both text and textbuttons, so when I originally added the glow shown above, all the text on the preferences started glowing and it felt a little bit overwhelming. To circumvent that, you have to basically tell Ren'Py to differentiate between text and textbuttons in the interface, by adding the following (shown here with my glow):
define gui.button_text_idle_outlines = [ (absolute(3), "#9cc3bd57", absolute(0), absolute(0)), (absolute(2), "#9cc3bdcc", absolute(0), absolute(0)), (absolute(1), "#9cc3bd", absolute(0), absolute(0))]
define gui.button_text_hover_outlines = [ (absolute(3), "#ff9a8b73", absolute(0), absolute(0)), (absolute(2), "#ff9a8bb0", absolute(0), absolute(0)), (absolute(1), "#ff9b8b", absolute(0), absolute(0))]
define gui.button_text_selected_idle_outlines = [ (absolute(3), "#9cc3bd57", absolute(0), absolute(0)), (absolute(2), "#9cc3bdcc", absolute(0), absolute(0)), (absolute(1), "#9cc3bd", absolute(0), absolute(0))]
define gui.button_text_selected_hover_outlines = [ (absolute(3), "#ff9a8b73", absolute(0), absolute(0)), (absolute(2), "#ff9a8bb0", absolute(0), absolute(0)), (absolute(1), "#ff9b8b", absolute(0), absolute(0))]
I wanted a different colour glow for my idle and hover states, so that's why I included both and gave them different colours. Once my buttons were glowing, I went back and changed the regular interface text to not use a glow, but just a regular outline, like so:
define gui.interface_text_outlines = [ (absolute(1), '#404040', absolute(0), absolute(0))]
Adding Outer Glow to Buttons (and Other Images)
For this next part, I used a tool. Now, I'll warn you in advance that I paid for this one, but it's very powerful! It's called Outline Shader for Ren'Py by Feniks and this is what I used to make my buttons and other gui elements to glow, since Ren'Py doesn't come with that capability right out of the box.
The main reason why I wanted to add image glow to my game was for all my buttons, since they no longer matched after I added glow to my game's textbuttons. So to keep everything cohesive, I wanted my radio/check buttons to also glow! I also did this same thing to a bunch of other gui aspects, but for funsies, let's use the radio buttons as an example, cuz I just think they're cute, hehe.
To do this, I basically replaced all the default check and radio buttons in the preferences menu with my custom version, which would utilize an button containing an image background and text styled like my interface text buttons. First, I had to define the images for my radio buttons, which I just plopped into my 'script.rpy'. Depending on the look you're going for, you'll need between 1 and 5 images for a single button. That's because buttons have 5 states; idle, hover, selected_idle, selected_hover & insensitve, explained here. In my case, I wanted one button for when it is selected, and one for when it wasn't, and then idle and hover would be illustrated by changing the glow colour(using the Outline Shader). And because these buttons won't ever be disabled, I didn't need anything for the insensitive state. So that means I only ended up defining four images, by using 2 different PNG's and two different 'outline_transform's like this:
image mybutton_idle = At("gui/button/radio_foreground.PNG", outline_transform(4, "#9cc3bd", 100.0, "#9cc3bd33"))
image mybutton_hover = At("gui/button/radio_foreground.PNG", outline_transform(4, "#ff9b8b", 100.0, "#ff9a8b2a"))
image mybutton_selected_idle = At("gui/button/radio_selected_foreground.PNG", outline_transform(4, "#9cc3bd", 100.0, "#9cc3bd33"))
image mybutton_selected_hover = At("gui/button/radio_selected_foreground.PNG", outline_transform(4, "#ff9b8b", 100.0, "#ff9a8b2a"))
I used the deselected version of my button for the 'idle' and 'hover' state, and the selected version for 'selected_idle' and 'selected_hover', then I added the outline transform in turquoise for both idle states, and in pink for both hover states. This mixing and matching ensures a cohesive, but unique appearance for each button. To make sure that your glow looks the same across both the text and buttons, you may have to play with the colours a little bit, but I managed to make them match by simply using a very transparent version of the colour for the second hex code given in the 'outline_transform'.
Then I went to my preferences screen in 'screens.rpy' where I removed the 'check' and 'radio' style prefixes, and replaced each text button with just a button, keeping the 'action' exactly as it was, like this:
button:
    yalign 0.5
    xsize 350
    ysize 50
    idle_background "mybutton_idle"
    hover_background "mybutton_hover"
    selected_idle_background "mybutton_selected_idle"
    selected_hover_background "mybutton_selected_hover"
    text "Window" style "radio_button_text" xpos 50 yalign 0.5
    action Preference("display", "window")
As you can see, To get the effect of the radio button, I used my previously defined images as backgrounds for the button, using each of the 4 different states and linking to the corresponding image. Then I added back the text from the previous textbutton and added back the 'radio_button_text' style in-line so that the radio button image and the text would react to user input at the same time! Then I just offset the text by 50 pixels to allow some space between the button and the text, otherwise, they'd naturally stack on-top of each other(which makes sense since we've used it as a background!)
As for the 'xsize' and 'ysize' of the button, I added these to ensure that my buttons didn't warp too heavily when the player changed font's or text scale, so that it would look good for the smallest version of the text, and the largest. But how'd I change the font and scale of the text? Keep reading!
Changing Font & Text Scale (Based on User Input)
An important pre-requisite to this, is that I've used Theo Minute's Accessibility Add-On to add more accessible options to my game. As part of this tool, there is functionality to change the font and size of your text, which will persist between loads. If you haven't already looked into this add-on, I really recommend it. Accessibility is so important so even if you don't use that specific toolset, definetly consider adding in accessible options to your game in other ways.
Anyways, I've used that tool and I just updated the default DejaVu font to one that better fits the style of my game, and then added check buttons to the preferences screen so that players can choose them. (The details of this are in the add-on's files)
But I didn't like that these options were buried in the preferences menu, and I wanted to give my players a choice of their text right off the bat before they even get into the game. To do this, I added a screen at the start of my game that allowed for players to get a preview of the game and select the one they think will suit them best. Obviously, they can change it later, but it's always nice to adjust basic settings before you get into the game, in my humble opinion!
So what do we do? We add a splash screen! To do this, add the following to your 'script.rpy' above the 'start' label:
label splashscreen:
    scene black
    with Pause(1)
    return
Right now, I've added a bit of a pause before we do anything else. I'll eventually put my logo there but for now, it's fine. Next, if you want to call a menu, you have to make a menu! Here's what mine looks like right now:
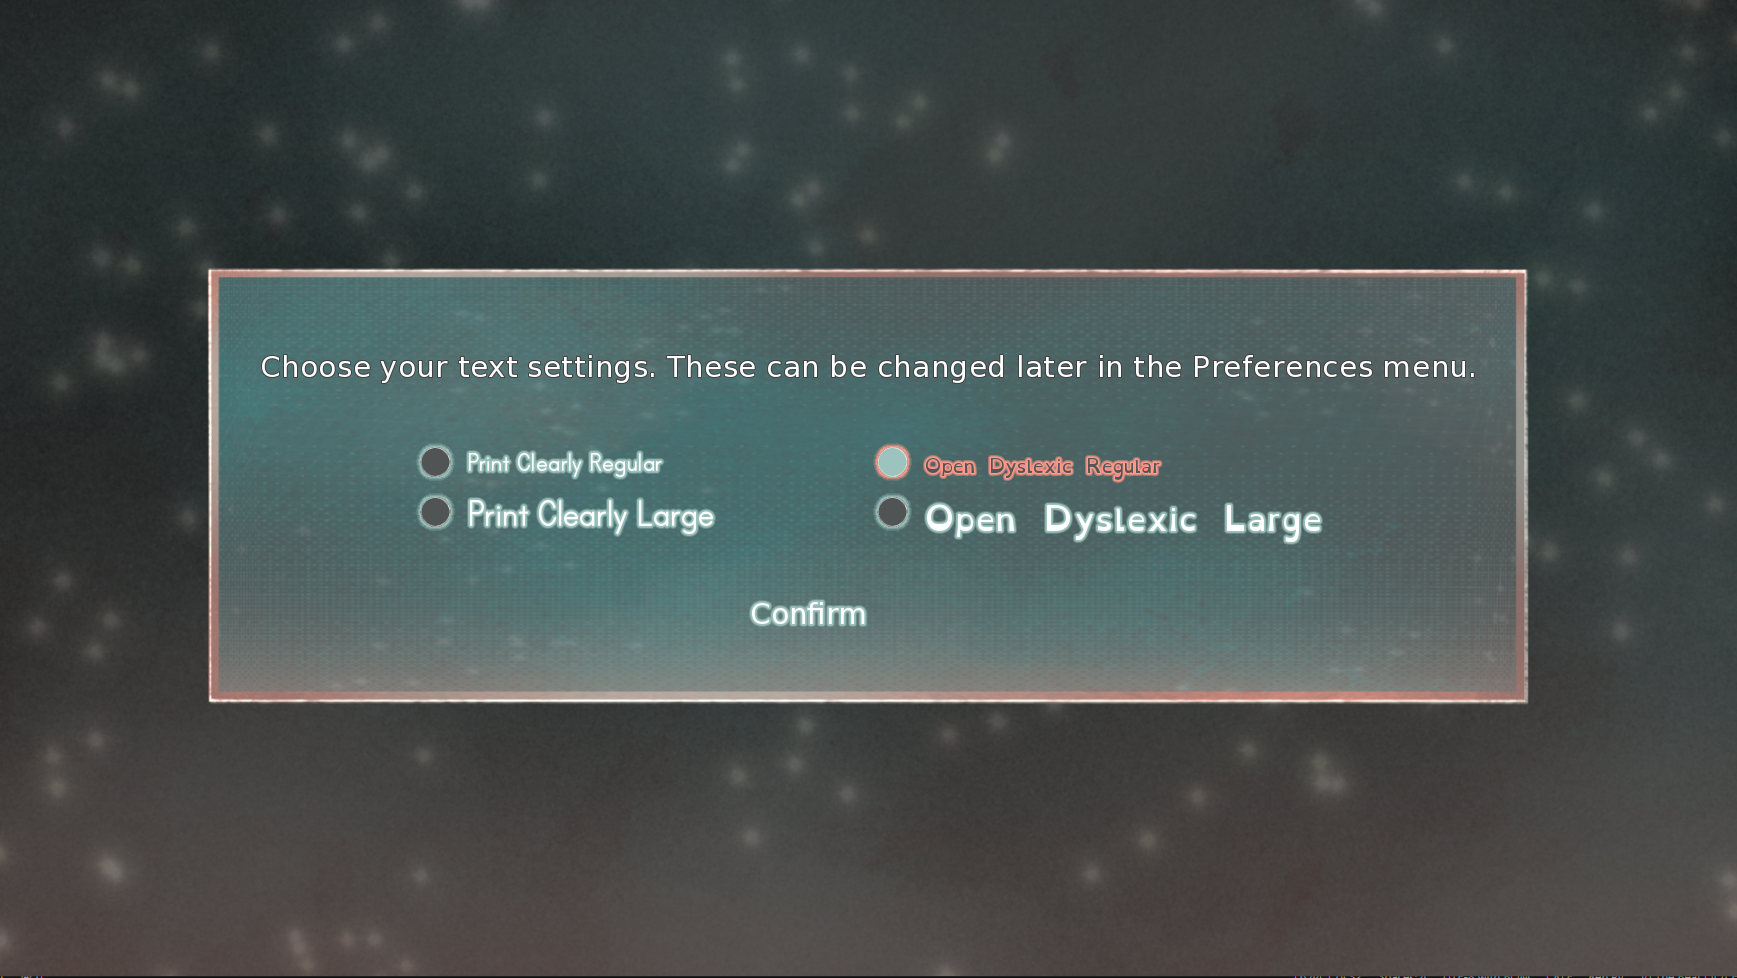
Basically I just created a new screen and utilized the existing 'frame' style in the gui. You'll notice that my frame looks a bit different, that's just because I replaced the images with custom ones, don't worry about that. Next, I basically copied over the buttons that I wanted from the preferences screen and plopped 'em into a 2 by 2 grid. Behold the code for this screen:
screen preferencesSplash:
    tag menu
    style_prefix "confirm"
    add "gui/overlay/confirm.png"
    frame:
         vbox:
             xalign 0.5
             ypos 30
             spacing 10
             text "Choose your text settings. These can be changed later in the Preferences menu." style "confirm_prompt_text"
             grid 2 2:
                 xalign 0.5
                 ypos 50
                 spacing 5
                 button:
                     yalign 0.5
                     xsize 300
                     ysize 50
                     idle_background "mybutton_idle"
                     hover_background "mybutton_hover"
                     selected_idle_background "mybutton_selected_idle"
                     selected_hover_background "mybutton_selected_hover"
                     text "Print Clearly Regular" style "radio_button_text" xpos 50 yalign 0.5 font "print_clearly_bold_tt.ttf" size 32
                     action [SelectedIf(SetVariable("splashselection", "PCR")), SetVariable("splashselection", "PCR")]
                 button:
                     yalign 0.5
                     xsize 300
                     ysize 50
                     idle_background "mybutton_idle"
                     hover_background "mybutton_hover"
                     selected_idle_background "mybutton_selected_idle"
                     selected_hover_background "mybutton_selected_hover"
                     text "Open Dyslexic Regular" style "radio_button_text" xpos 50 yalign 0.5 font "OpenDyslexic3-Regular.ttf" size 20
                     action [SelectedIf(SetVariable("splashselection", "ODR")), SetVariable("splashselection","ODR")]
                 button:
                     yalign 0.5
                     xsize 500
                     ysize 50
                     idle_background "mybutton_idle"
                     hover_background "mybutton_hover"
                     selected_idle_background "mybutton_selected_idle"
                     selected_hover_background "mybutton_selected_hover"
                     text "Print Clearly Large" style "radio_button_text" xpos 50 yalign 0.5 font "print_clearly_bold_tt.ttf" size 45
                     action [SelectedIf(SetVariable("splashselection", "PCL")), SetVariable("splashselection", "PCL")]
                 button:
                     yalign 0.5
                     xsize 500
                     ysize 50
                     idle_background "mybutton_idle"
                     hover_background "mybutton_hover"
                     selected_idle_background "mybutton_selected_idle"
                     selected_hover_background "mybutton_selected_hover"
                     text "Open Dyslexic Large" style "radio_button_text" xpos 50 yalign 0.5 font "OpenDyslexic3-Regular.ttf" size 35
                     action [SelectedIf(SetVariable("splashselection", "ODL")), SetVariable("splashselection","ODL")]
              vbox:
                 xsize 400
                 ysize 200
                 xalign 0.5
                 yalign 0.1
                 if splashselection != "none":
                     textbutton _("Confirm"):
                         style "return_button"
                         action [SetField(persistent, "PrefSplash", True), Return()]
Before moving on, take a look at the action in the 'Confirm' button. You see it? Good, moving on.
Basically, I wanted to show each button as it would look in-game, so I mimicked it by adjusting the font and scale of each button's text. Then I made a variable called 'splashselection' and set it's initial value to 'none':
define splashselection = "none"
Using this, I update the variable whenever the player selects a radio button. The value gets set to a lil' acronym for the font name and scale name, and that's how it knows what's selected and what's not. I also set up the return button to only appear once the player has selected a radio button, meaning the player can't proceed until they've made a choice.
From here, I went back to the splash screen label in 'script.rpy' and called the screen, then set used the 'changeFont' and 'changeScale' functions (reminder that these are from the Accessibility Add-On), based on whichever radio button the player had last selected before hitting the confirm button. One important thing to note here, is that you have to 'call' the screen, to prevent the splashscreen label from ending prematurely(as opposed to 'show'ing the screen, which wouldn't wait for the player to make a selection).
    if persistent.PrefSplash == False:
         call screen preferencesSplash
     if splashselection == "PCR":
         $ changeFont("print_clearly_bold_tt.ttf")
         $ changeScale("regular")
     elif splashselection == "ODR":
         $ changeFont("OpenDyslexic3-Regular.ttf")
         $ changeScale("regular")
     elif splashselection == "PCL":
         $ changeFont("print_clearly_bold_tt.ttf")
         $ changeScale("larger")
     else:
         $ changeFont("OpenDyslexic3-Regular.ttf")
         $ changeScale("larger")
Another thing to notice is that I've put the 'call screen' within an 'if' statement. You'll have to define this variable before adding it, but then you'll be able to essentially hide the splashscreen once the player has made their selection. To do this, you'll want to use a persistent variable so that it .... ya know... persists... Which means it will last FOREVER, ie. they'll never have to see this menu again, cuz they've already done what they needed to do. Mine just looks like this:
default persistent.PrefSplash = False
Easy, right? Anyway, just use this to check whether or not the splash screen menu we made should be called or not, and then, very importantly, we have to make sure that we actually set the variable to 'True' once the player has made their selection. Remember before when I asked you to look at the action for the 'Confirm' button? Yup, that's right. That's where the variable gets switched on. Wanna see it again? Here it is:
action [SetField(persistent, "PrefSplash", True), Return()]
Nice! Well I think that just about covers everything! My gui still needs a lot of tweaking, but it feels to get into the swing of things and check some stuff off the list!
Let me know if you learned something new or found this log interesting in the comments below. And if there's anything that you would change in your own implementation, let me know that as well! Otherwise, thank you for reading and I hope you'll look forward to my new game!
Have a lovely day & remember to be kind!
Moo 🐄
Leave a comment
Log in with itch.io to leave a comment.